Showing posts with label Software Tips. Show all posts

Tuesday, May 10, 2011

How to Install Windows XP and Remove Windows Vista

How to Install Windows XP and Remove Windows Vista
Windows Vista is not yet perfected and chances are you will reach the point where you want to revert to Windows XP. But the task is easier said than done especially if you want a clean copy of Windows XP on your PC. With that in mind, what can you do to uninstall Windows Vista and install Windows XP on your computer? Well, I had that problem last week and much as I looked for solutions on the web, I discovered a different way to remove Windows Vista and install a fresh Windows XP operating system.

How? Follow these steps.

1. Grab a hold of the usual bootable DOS disk. Some peripherals (particularly laptops) no longer come with the traditional floppy drives but not to worry. You can still download the DOS system from sites and burn them on a CD which you can use to boot.

2. Boot up your PC using the CD ROM as your first boot device. Allow it to load and then run the handy FDISK like before.

3. View the partitions on your hard drive and delete them one by one. Make sure you don’t leave any drive intact to make sure you get a RAW drive ready for formatting.

NOTE: As far as backups are concerned, this guide assumes that they have been already backed up or that the user wants to completely erase the Windows Vista OS.

4. After all partitions have been deleted or removed, place your Windows XP setup disk and restart the computer. Now you can install the Windows XP OS as you would in any first time setup. Some people have tried to use the dual boot which is really ridiculous.

For one, it eats up space and second why would you leave an operating system when you have no plans of using it. Some have even said that it causes problems so why leave it there in the first place?

Also, if at times you are attempting to overwrite Windows Vista, chances are your Windows XP setup will not even reach the first screen setup (blue screen). Such is the problem I had experienced that led me to find an alternative to which is itemized above.

These steps are guaranteed. Don’t let Windows Vista be a pain. You can outthink Windows Vista using the traditional way of formatting a computer, similar to the first time you install Windows XP.

Friday, May 6, 2011

Lessons from getting hit by a computer virus

For the 10th time, I got hit by a computer virus. This time, though, it was a nasty hit. I was happily surfing the Internet last weekend when my antivirus software started detecting it. I am not yet sure if it is a Trojan (a malicious program that leaves a backdoor open in your system for hackers to take control), or a computer worm (self-replicating malware). But it was clear. It was annoying and it took control of my laptop. As one saying goes, there are many ways to skin a cat. The most effective and y et desperate way to get rid of a computer virus is to format the computer. Wipe the hard drive clean, and start afresh. But that would mean losing all your important files, data, and programs -- not to mention wasted man hours in reinsta lling the operating system, drivers, etc. So that wasn't an option. I had to fi nd a way to take out the computer virus with surgical precision. A friend who is computer virus expert told me that getting rid of a computer virus is like peeling an onion. No, it does not make you cry. You have to pass th rough several layers to get to the juicy part.

It took me to kill da bastard . We ran full scans, using both my existing antivirus software and an online free service from Trend Micro. The software was able to detect it. It was called CRYP_NSANTI. It was a Trojan. But when we chec ked for a solution, there was none at this time. I Googled it and found that ot hers have recently been hit, and were asking how to get rid of it. He used a free trial antivirus software version from Avira and launched a Filipino-made solution called Noob Killer, which fixed Windows registries in my system. You c an Google both and find a way to download the software. Noob is apparently a solution developed by Pinoy techies. The free antivirus detected 30 more infected files.

They were all quarantined. The Noob Killer was then launched, correcting registries affected by th e computer virus. I asked what Noob Killer did to the nasty computer malware, a nd our in-house techie said that it "patched" the damaged "autorun" configurati on of my system, and sought other computer viruses/worms that are spreading through removable medias. Lessons: if you're patient enough, there are free and effective fixes online. But you have to have an expert with you when using such software. Also, numerous free trial versions of antivirus software are on the Internet. You can download them and use them to scan and quarantine computer viruses. Finally, it is bes t to update your antivirus software.

If it's a corporate account, then ask your network administrator if it comes with the latest fixes. More lessons: be careful in deleting files during computer virus scans. It is b est to quarantine them first. Also always make sure that you scan removable med ia you plug in to your computer. That means USB thumb drives, external hard dis k drives, and other media. Computer worms are now spreading through removable media, and it can be a nasty problem. Finally, I learned that today's computer viruses will not necessarily render your system useless. But when not dealt with quickly, it would. In past discussions with computer virus experts, computer malwares are increasingly being launch ed to steal passwords, usernames, and other personal information on an infected system. So when you're infected, it is best to seek the help of an expert. You would never know that they are just sitting in a little corner in your office.

How to increase internet speed

Test your Internet connection speed. You can do this by going to one of these speed test websites: Speakeasy.net/speedtest or Speedtest.net. Record your results. Compare the speeds from step one and step two. If your getting the speed your paying for go no further.

Disable web-browser Add-ons that can slow down your Internet connection speed. Check to see if you have multiple web browser Add-ons operating with your browser. For example, if your web browser is Internet Explorer, go to Tools, select Manage Add-ons, and look at what Add-ons are enabled. Disable the ones you do not want to use.

Download TCP Optimizer software to optimize your computers MTU (Maximum Transmission Unit) values, RWIN (Receive Window) values, and broadband related registry keys. The most popular and FREE TCP Optimizer that I found is called "SG TCP Optimizer". You can download it at CNET: http://www.download.com/SG-TCP-Optimizer/3000-2155_4-10488572.html?tag=lst-1 or at PCWORLD: http://www.pcworld.com/downloads/file/fid,68524-order,1-page,1/description.html.

Retest your Internet connection speed by going to one of these speed test websites: Speakeasy.net/speedtest or Speedtest.net. Record and compare these results with the results obtained from steps one and two.

Wednesday, January 19, 2011

Common Problems in PC crashes

Common Problems in PC crashesHere are some Common Problems in PC crashes. Your computer slows down, and part of the screen goes either black or white. This usually means that you’re using too many applications or programs all at once, and your computer can’t handle it. Try pressing ctrl+alt+delete, and look for the program that giving you trouble (usually labeled “not responding”), then try closing the said application by clicking end task. And if your computer is still in the line age of the dinosaur, try not to do all things at once. You might end up with less than you want to gain. Also, this may mean that your 20 years old version computer needs some upgrading like increase of RAM, or better yet, a new computer.

You removed some files or programs from your PC, and the next time you boot up, it won’t.
All computer operating systems (OS) have their own standard files and applications that will render the computer inoperable if you remove them. It safe to say that in windows, whatever was installed in your PC should not be removed, because windows will look for it when you boot up again. Also don’t simply delete programs that look unnecessary or uninstall them. When you boot up, windows system files look for programs that have been installed, so whether you remove the program manually or accidentally, you’re bound to get in trouble.

You installed a new hardware and software, and get a fatal exception error (or something like that). That’s what you called “Blue Screen of Death”. You might have installed something that is incompatible with your OS, it might be a new sound card, RAM, device driver, software. Try to remove that hardware that you installed or download the latest software updates for that particular hardware. Also pieces of advice, if you are unsure about installing something, try to find someone who knows better.

Why doesn’t my PC shut down, why is it so slow? When about to shut down your PC, allow a few minutes for some rest time. Illegal shutdowns can result in more permanent damage to your files or worst to your PC as well. The system might still be resolving something, maybe like cleaning up temporary files or folders, reallocating memory. This will help prevent from crashes. Try to backup your files on another media, like CD, DVD, or another hard disk. When your system fails, you can still restore your files. Screensavers and desktop themes along with a huge desktop picture of you and your boyfriend/girlfriend can also eat up resources, so try to disable those, or get one that’s not too heavy. Regular system maintenance can prevent slowing down or crashes of your PC. Try to run disk defragmenting and scan disk sessions, virus scanning, dust cleaning, and cleaning up unwanted files. That’s all folks thanks for reading.

Wednesday, December 29, 2010

How to Start Windows in Safe Mode

You can choose the Safe Mode with Networking option, which loads all of the above files and drivers and the essential services and drivers to start networking, or you can choose the Safe Mode with Command Prompt option, which is exactly the same as safe mode except that a command prompt is started instead of the graphical user interface. You can also choose Last Known Good Configuration, which starts your computer using the registry information that was saved at the last shutdown. Follow the instructions below How to Start Windows in Safe Mode for your specific version of Windows.

Windows 2000
Note: You should print these instructions before continuing. They will not be available after you shut your computer down in step 1.
• Click Start, click Shut Down, and then, in the drop-down list, click Shut down.
• When you see the black-and-white Starting Windows bar at the bottom of the screen, start pressing the F8 key on the keyboard. The Windows 2000 Advanced Options Menu appears.
• Use the arrow keys to highlight the appropriate safe mode option, and then press ENTER.
• The computer then begins to start in Safe mode.
• After finished with all troubleshooting, close all programs and restart the computer in normal mode.

Windows XP
Note: You should print these instructions before continuing. They will not be available after you shut your computer down in step 1.
• If the computer is running, click start, and then click turn off the Computer.
• In the Shut Down Windows dialog box, click Restart, and then click OK.
• Start pressing the F8 key. The Windows Advanced Options Menu appears. If you begin tapping the F8 key too soon, some computers display a “keyboard error” message. To resolve this, restart the computer and try again.
• Use the arrow keys to highlight the appropriate safe mode option, and then press ENTER.
• The computer then begins to start in Safe mode.
• After finished with all troubleshooting, close all programs and restart the computer in normal mode.

Windows Vista
• Turn the computer on or Restart the computer
• Start pressing the F8 key. The Windows Advanced Boot Options Menu appears. If you begin tapping the F8 key too soon, some computers display a “keyboard error” message. To resolve this, restart the computer and try again.
• Use the arrow keys to highlight the appropriate safe mode option, and then press ENTER.
• The computer then begins to start in Safe mode.
• After finished with all troubleshooting, close all programs and restart the computer in normal mode.

Monday, November 9, 2009

Error Message: Conflict IP Address on the network

Have you ever encountered a network error message that pop-up and say "Conflict IP address in a network?" It means that there is two or more of the same IP address in your network. Sometimes it is happening when your IP address was obtained manually because you might maybe forgot that you already put the first IP address in some of the computers. There is a way to avoid conflict of IP Addresses in a network and that is rechecking the IP address in your computers. To solve this problem either you put the IP address automatically or recheck and put it manually again a different IP address for that particular computer.

Follow these Instructions on how to automatically or manually set a static IP Address in Network Computers.

Do one of the following: Manually
1. Right Click the Icon of "My Network Places" then go to properties.
2. Right Click the "Local Area Network Icon" then choose properties.
3. When the Local Area Network Properties appear, look and double click on the “Internet Protocol (TCP\IP)” or click the button Properties.
4. Then the Internet Protocol (TCP\IP) Properties will appear. Click "Use the Following IP Addresses".
5. Then you can now set manually an IP Addresses for that particular computer. Including your subnet mask "255.255.255.0" and the default gateway of the internet server.

Do one of the following: Automatically
1. If you want IP settings to be assigned automatically, first repeat the procedure 1, 2, and 3 above, when the Internet Protocol (TCP\IP) Properties appear, click Obtain an IP address automatically, and then click OK.

Thursday, October 15, 2009

How to remove unused desktop icons

Desktop Icons are small picture that typically represents a program or file. Double-clicking an icon opens the associated program or file. But sometimes there are icons in our desktop that needs to be removed because you’re not using them or it is unnecessary.

To remove unused desktop icons
1. Open Display in Control Panel.
2. On the Desktop tab, click Customize Desktop.
3. Under Desktop cleanup, click Clean Desktop Now.
4. Follow the directions in the Desktop Cleanup Wizard.
Notes
1. To open Display, click Start, click Control Panel, and then double-click Display.
2. The Desktop Cleanup Wizard displays a list of the desktop icons that have not been used for 60 days or more, enabling you to remove those icons that you don't want on your desktop. You can retrieve icons you have removed by opening the Unused Desktop Shortcuts folder on your desktop.
3. Clear the Run Desktop Cleanup Wizard every 60 days check box if you don't want the wizard to run automatically every two months.
4. You can remove an individual desktop icon by right-clicking the icon and then clicking Delete.
5. To add or remove the icons for My Documents, My Computer, My Network Places, or Internet Explorer, select or clear those items under Desktop icons.

Thursday, October 8, 2009

How to Pin or Assign Programs for easy access

Want to keep your programs within easy reach? Windows XP lets you customize the Start menu and task bar so you can launch your favorite programs whenever you want them. No more searching for your favorite programs; you can easily pin, or assign, programs to the Start menu. Or you can use the Quick Launch bar as a way to keep other programs at your fingertips; ready to go at the click of the button. You can also place convenient shortcut icons on your desktop. Shortcut icons provide instant links to important files, folders, and other applications - even your printer and Internet connection - with a touch of your mouse. Here's how to pin a program to the Start menu. As an example, we'll pin the Windows XP Calculator program to the Start menu.


Pin Calculator to the Start menu
1. Click Start, and then click All Programs.
2. Click Accessories and point to Calculator.
3. Right-click Calculator and click Pin to Start menu.
4. Click anywhere on the desktop to quit the Start menu.

That's all there is to it. The above works for any program on your computer, putting those programs on the Start menu until you decide to remove them.

How to add sound effects

The customizing features of Windows XP offer more than just visual tweaks. You can also add sound effects - silly or sensible - to orchestrate any move, from opening and closing folders to emptying the Recycle Bin. Sound effects are a perfect complement to any customized desktop and a great way to express your personality. Adding them is easy, too. Here's how:

Add sound effects
1. Click Start, and then click Control Panel.
2. Click Sounds, Speech, and Audio Devices.
3. Under Pick a task, click Change the sound scheme.
4. On the Sounds tab, under Program events, click the event to which you want to apply a sound.
5. In the Sounds list, click the sound you want to link to the event.
6. To hear the sound, click the playbutton to the right of the Sounds list. If you are satisfied with your choice, click OK. Repeat steps 4 and 5 until you have linked sounds to as many program events as you want.
7. To save your settings into a personalized sound scheme, click Save As. Type a name for the sound scheme, and then click OK.
8. Click OK to complete the procedure and save your sound scheme.

While Windows XP contains many sound effects to choose from, you can create your own by copying them from other sources, such as CDs or the Internet, and storing them on your hard drive.

How to change your desktop background

Customize your desktop's background! You can repaint it any color of the rainbow, or fill it with a pattern, image, or favorite photo. Windows XP contains a selection of backgrounds to choose from. You can also capture photos and other graphics on the Web. Here's how to give your desktop a fresh look:

1. Open Display in Control Panel.
2. On the Desktop tab, do one or more of the following:
3. Click a picture in the Background list. In Position, click Center, Tile, or Stretch.
4. Click Browse to search for a background picture in other folders or on other drives. You can use files with the following extensions: .bmp, .gif, .jpg, .dib, .png, .htm. In Position, click Center, Tile, or Stretch.
5. Select a color from Desktop color. The color fills the space not used by a picture.
Notes
You can use a personal picture as a background. All of your personal pictures located in My Pictures are listed by name in the Background list. You can save a picture from a Web site as a background. Right-click the picture and then click Set as Background. The picture is listed in the Background box as Internet Explorer Background. If you choose an .htm document as your background picture, the Position options are unavailable. The .htm document is automatically stretched to fill your background.

How to Add a Colorful Screensaver

Brighten your work area when your computer is idle by adding a colorful screen saver. Windows XP contains a large selection. Here’s how to add a colorful screen saver.

Choose a screen saver
1. Click Start, and then click Control Panel.
2. Click Appearance and Themes.
3. Under Pick a task, click Choose a screen saver.
4. On the Screen Saver tab, in the Screen saver list, click the screen saver you want.
5. Click Preview to view the screen saver for a few seconds (move your mouse or press any key to end the preview), and then click Settings to customize its behavior.
6. When you are satisfied with your choice, click OK.

Want a screen saver with extra personality? Choose My Pictures Slideshow from the drop-down menu, and then click Settings to add favorite photos from your hard drive.

Monday, July 13, 2009

How to Disable Autoplay of USB/CD Drives

How to Disable Autoplay of USB/CD Drives

If you find windows that display an autoplay window that always popup and ask you what to do when you insert a USB device or insert a CD or DVD very annoying. Here is a way to simply turn it off.

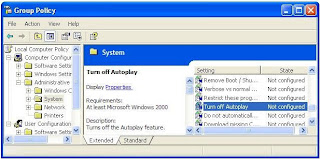
1. To open your Group Policy window to configure the “Turn off Autoplay” function of your system. To do this Click on start –> Run –> Type “gpedit.msc“.

2. Click on Administrative Templates, and click on “System”.
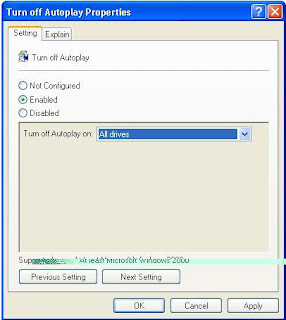
3. Double click on the item called “Turn off Autoplay

4. Set the radio or option button to “Enabled” and change the value of “Turn off autoplay on:” to All Drives (see image above).
5. That’s it you disable the autoplay of USB/CD Drives Window on your computer. Hope you find this very useful.

Monday, June 1, 2009

How to Hide File and Folder in Windows


Other method by protecting your data in your computer is by hiding it. Though, this quite simple but still can help hiding your data from other user. So here are some tips that will help you hide and protect your files and folders.

File
Body of stored data or information in an electronic format. Almost all information stored on computers is in the form of files. Files reside on mass storage devices such as hard drives, CD-ROMs, magnetic tape, and floppy disks. When the central processing unit (CPU) of a computer needs data from a file, or needs to write data to a file, it temporarily stores the file in its main memory, or Random Access Memory (RAM), while it works on the data.

Folder
A graphical user interface (GUI), a container for programs and files, symbolized on the screen by a graphical image (icon) of a file folder. A folder is equivalent to a directory in that it can hold both files and additional folders and, like a directory, is a means of organizing programs and documents on a disk.

To hide a file or folder
  1. Open My Documents.
  2. If the file or folder you want to hide is not located in My Documents or its subfolders, go to other drive and search for that particular file or folder.
  3. If you can’t find it, use Search. To open Search, click Start, and then click Search.
  4. Right-click the file or folder, and then click Properties.
  5. On the General tab, select the Hidden check box.

Wednesday, May 6, 2009

How to change the Screen Resolution of your Monitor

The setting that determines the amount of information that appears on your screen, measured in pixels. Low resolution, such as 640 x 480, makes items on the screen appear large, although the screen area is small. You can switch your screen resolution temporarily to 640 X 480 if you have games or other programs that are set to run at that resolution. High resolution, such as 1024 x 768, makes the overall screen area large, although individual items appear small. Your monitor and video adapter determine how much you can change your screen resolution. You may not be able to increase the resolution above a certain level. Here as some steps that will help you on how to change the screen resolution of your monitor.
Screen Resolution
To change your screen resolution


  1. Open Display in Control Panel.
  2. On the Settings tab, under Screen resolution, drag the slider, and then click Apply.
  3. When prompted to apply the settings, click OK. Your screen will turn black for a moment.
  4. Once your screen resolution changes, you have 15 seconds to confirm the change. Click Yes to confirm the change; click No or do nothing to revert to your previous setting.

To change screen resolution in desktop


  1. Right-click on desktop (Make sure you don’t hit the icons). Then click Properties.
  2. On display property, click settings tab, under Screen resolution, drag the slider, and then click Apply.
  3. When prompted to apply the settings, click OK. Your screen will turn black for a moment.
  4. Once your screen resolution changes, you have 15 seconds to confirm the change. Click Yes to confirm the change; click No or do nothing to revert to your previous setting.

Monday, May 4, 2009

How to fix Registry Editor

Disabled Registry Editor
One of my friends told me that he has a problem on his own computer. His problem was he cannot open the registry editor and there’s a popup message that say’s “Registry Editing Has Been Disabled By Your Administrator”. This type of problem usually also happens to me when I am working on a virus infected computer. My friend told me that his computer was infected by a virus but he already removes the virus from his computer. Regedit is one of the most important commands of Windows that is also why virus programmers disable the Registry Editor so it’s difficult to the user to solve the problem. Below are the different ways that I done to re-enable the Registry Editor. (See What is Windows Registry)


  1. Using Symantec’s tool. Sometimes worms and Trojans will make changes to the shell\open\command registry entries as part of their infections. This will cause the virus to run each time you try to run an .exe file such as the Registry Editor. Download the UnHookExec.inf file to your computer. Install it in your computer. Restart your computer and then try to open the Registry Editor.

  2. Using a registry tool. You can use regtools.vbs to enable your registry. This is a VBscript that enables or disables the Registry Editor based on the following location in the registry. Of course, since the registry editor is disabled, you can’t change it manually. After downloading regtools.vbs double-click on it to run, then reboot your computer and try to open the Registry Editor again.

  3. Changing Windows XP and Group Policy Editor. If you have Windows XP and access to an administrative user account, you could change the registry editor options in the Group Policy Editor.
  • Click on Start then Run
  • Type GPEDIT.MSC and Press Enter
  • Go to the following location. User Configuration, Administrative Templates, and System.
  • In the Settings, find the option for “Prevent Access to Registry Editing Tools” and double-click on it to change.
  • Select Disabled or Not Configured and choose OK. Close the Group Policy Editor and restart your computerTry opening REGEDIT again

There are also some other ways to re-enable the registry editor but these three is the only ways that I know. If you know some other ways to fix Registry editor just let me know by leaving a comment below.

Tuesday, April 21, 2009

How to Fix your Task Manager

Disabled Task ManagerWindows Task Manager provides information about computer performance and displays details about programs and processes running on your computer. If you have an experience when your using a programs just stops responding, of course most of us do when a certain programs just stop working or hangs the first thing that always comes to our mind is to end it using Task Manager. But when you hit CTRL+ALT+DEL a box pops out containing the message “Task Manager has been disabled by your administrator“. Why these messages appear? This error message appears due to restriction placed in the Windows Registry. Some of us scared trying to change the registry settings. And the only things you can enable back your Task Manager by editing some registry settings. For a normal user editing registry is not easy and a bit risky. Well here is a solution to the problem if you’re scared to change your Task Manager problem. Download this PC utility to enable your Task Manager.

This piece of software is called Task Manager Fix is designed to enable the disabled Task Manager it remove task manager restrictions and effective solution to the problem. Download here for FREE Task Manager Fix tool.


Related Topic: (What is the Function of Task Manager?)

Wednesday, April 15, 2009

How to use Disk Defragmenter

Disk Defragmenter analyzes local volumes and consolidates fragmented files and folders so that each occupies a single, contiguous space on the volume. As a result, your system can access files and folders and save new ones more efficiently. By consolidating your files and folders, Disk Defragmenter also consolidates a volume's free space, making it less likely that new files will be fragmented. The process of consolidating fragmented files and folders is called defragmentation. The amount of time that defragmentation takes depends on several factors, including the size of the volume, the number and size of files on the volume, the amount of fragmentation, and the available local system resources. You can find all of the fragmented files and folders before defragmenting them by analyzing the volume first. You can then see how fragmented the volume is and decide whether you would benefit from defragmenting the volume. Disk Defragmenter can defragment volumes that are formatted with the file allocation table (FAT) file system, the FAT32 file system, and the NTFS file system. Using Disk Defragmenter will help speed up your computer. (See How to Speed Up your Computer)

Disk Defragmenter
To open Disk Defragmenter,
  1. Click Start, point to All Programs, point to Accessories, point to System Tools, and then click Disk Defragmenter.

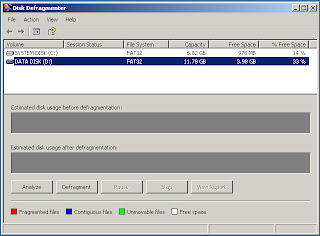
  2. Click the volume that you want to check for fragmented files and folders, and then click Analyze.

  3. When Disk Defragmenter finishes analyzing the volume, it displays its analysis of the volume in the Analysis display. It also displays a dialog box that tells you whether you need to defragment the volume.

  4. Click the volume that you want to defragment, and then click Defragment.

  5. After the defragmentation is complete, Disk Defragmenter displays the results in the Defragmentation display.

  6. Click View Report to view the Defragmentation Report, which displays detailed information about the volume you defragmented.

Note: After you click the Defragment Button and if there a message that says: “A volume has only 14% (or much lower than that) free space available for use by Disk Defragmenter. To run effectively, Disk Defragmenter requires at least 15% usable free space” just click “Yes” to continue to defrag. Disk Defragmenter uses this space as a sorting area for file fragments. If a volume has less than 15% free space, Disk Defragmenter will only partially defragment it. To increase the free space on a volume, delete unneeded files or move them to another disk.

How to used Scandisk

Windows provides a utility called Scandisk that will automatically detect and fix much of the damage, improving your system's performance in the process. Using Scandisk it helps detecting and repairing disk errors and recover readable information on it. This post will help speed up your computer. (See How to Speed Up your Computer)

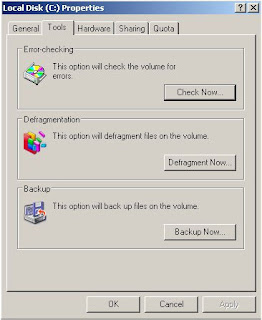
You can use the Error-checking tool to check for file system errors and bad sectors on your hard disk.
  1. Open My Computer, and then select the local disk you want to check.
  2. On the File menu, click Properties.

  3. On the Tools tab, under Error-checking, click Check Now button.
  4. How to used scandisk
  5. It will open the Local Disk or Drive Properties window. It depends on the name of your drive.

  6. Under Check disk options, There are two check box options: (A)Automatically fix file system errors. (B)Scan for and attempt recovery of bad sectors.

  7. Select either one or both of the two check box to automatically repair file-system errors found during disk checking and try to locate bad sectors and recovers readable information.

Notes:
All files must be closed for this process to run. If the volume is currently in use, a message box will appear prompting you to indicate whether or not you want to reschedule the disk checking for the next time you restart your system. Then, the next time you restart your system, disk checking will run. Your volume will not be available to perform other tasks while this process is running. If your volume is formatted as NTFS, Windows automatically logs all file transactions, replaces bad clusters, and stores copies of key information for all files on the NTFS volume.


For more information, click (How to Run Disk Error Checking Utility)

How to use Disk Cleanup

Using Disk Cleanup

You can use Disk Cleanup to free up space on your hard disk by removing temporary Internet files, removing installed components and programs that you no longer use, and emptying the Recycle Bin. Disk Cleanup helps free up space on your hard drive. Disk Cleanup searches your drive, and then shows you temporary files, Internet cache files, and unnecessary program files that you can safely delete. You can direct Disk Cleanup to delete some or all of those files. Using these steps will help speed up your computer. (See How to Speed Up your Computer)

To open Disk Cleanup:
  1. Click Start, point to All Programs, point to Accessories, point to System Tools, and then click Disk Cleanup.
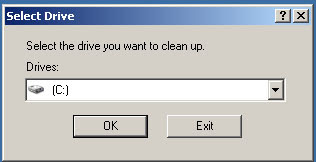
  2. If several local drives are available, you might be prompted to specify which drive you want to clean.
  3. Disk Cleanup
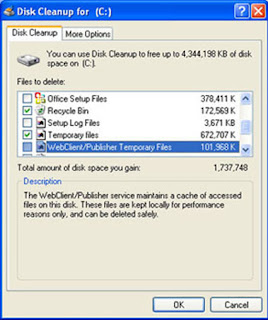
  4. In the Disk Cleanup dialog box, scroll through the content of the Files to delete list.

  5. Disk Cleanup
  6. Uncheck the check boxes for files that you don't want to delete, and then click OK.

  7. When prompted “Are you sure you want to perform these action?” just click Yes.

When running an operating system as complex as Windows, you may not always know the significance of all the files on your computer. Sometimes Windows uses files for a specific purpose and then retains them in a folder designated for temporary files. Alternatively, you may have previously installed Windows components that you are no longer using. For a variety of reasons, including running out of space on your hard drive, you may want to reduce the number of files on your disk, or create more free space, if it can be done without harming any of your programs.

Related Topics: click (How to use Disk Cleanup Utility)

Tuesday, April 14, 2009

How to Open Show Hidden Files and Folders

Certain files and folders are assigned the Hidden attribute by default. You can choose to display these hidden files and folders. You can also display file extensions for common file types, such as .txt or .htm. With Folder Options, you can specify how your folders function and how content is displayed.

To display hidden files and folders in Folder Options using Control Panel:
  1. Click Start, and then click Control Panel.
  2. Double-click Folder Options.
  3. On the View tab, under Hidden files and folders, click Show hidden files and folders.

Notes:
Hidden files and folders will appear dimmed to indicate they are not typical items. Usually, hidden files are program or system files that should not be deleted or changed. To display other hidden files, clear the Hide protected operating system files (Recommended) check box. If you want to see all file name extensions, clear or uncheck the Hide extensions for known file types check box.

To display hidden files and folders in Folder Options using My Computer or My Documents:

  1. Double-Click My Computer or My Documents icon on desktop.
  2. From the main menu select Folder Options.
  3. Then Click the View Tab.
  4. Then click Show hidden files and folders.
  5. To display other hidden files.
  6. Then uncheck Hide protected operating system files (Recommended).

To display hidden files and folders in Folder Options using Windows Explorer:

  1. Click Start, then Programs/All Programs, then Accessories, then click Windows Explorer.
  2. From the main menu select Folder Options.
  3. Then Click the View Tab.
  4. Then click Show hidden files and folders.
  5. To display other hidden files.
  6. Then uncheck Hide protected operating system files (Recommended).